Validator Set Up Instructions
How To Set Up Your SafeCoin Validator
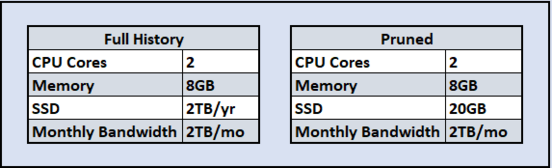
These instructions will help you to set up your SafeCoin Validator, either a full history node or a pruned node. The hardware requirements are similar for each. A full history node will record the entire blockchain, using a little under 2TB SSD space per year. The Pruned Node will only require around 20GB SSD space in total.
AVX support is mandatory for your VPS. The specs listed below are the bare minimum. It is recommended to go slightly higher in specs to reduce the chances of your Validator falling behind.
Part 1 – VPS Set Up & Log In
*For At-Home Set Up, skip to Part 2.
Ubuntu 20.04 is recommended.
Choose your VPS provider, and an instance that fits the hardware requirements. You don’t want your Validator to struggle or fall behind, so building one with a little more power might not be a bad idea.
Once you have your VPS installed, we will now SSH in and begin to build.
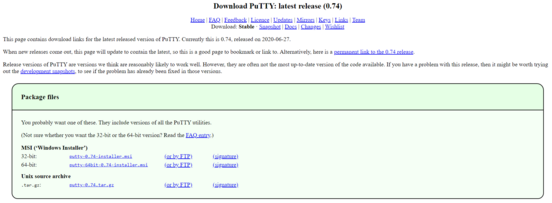
Download Putty (or any other SSH program) to log into your VPS.
CLICK HERE TO DOWNLOAD THE LATEST PUTTY VERSION.
Once we have Putty downloaded, open the program. You will see a screen like this:
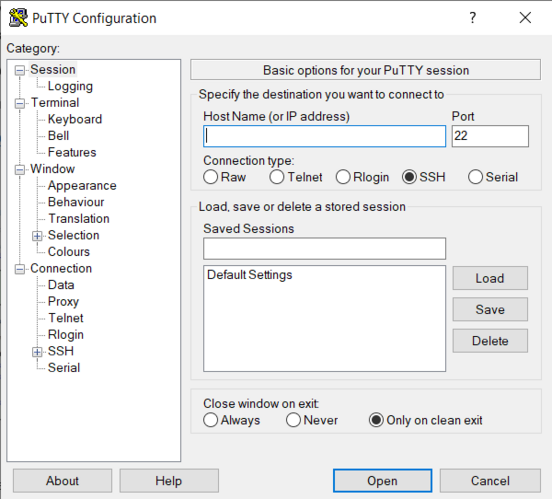
Copy the IP Address of your VPS, and Paste into “Host Name (or IP address), then click Open. This will open a Terminal connected to your VPS. You may get a security alert due to this being the first time logging into your newly created VPS.
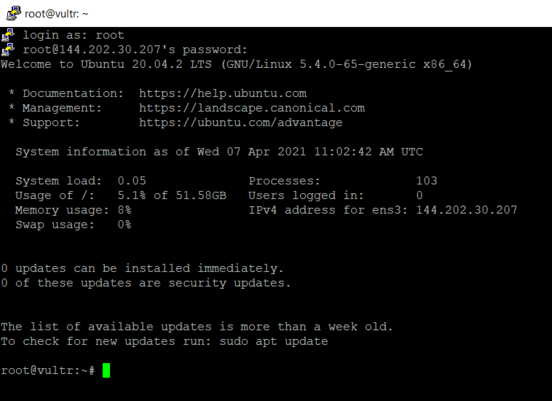
Once connected, use the log in credentials from your VPS provider.
- Username – root
- Password – xxxxxxxxxxxx
Part 2 – VPS Configuration
Next we will create a new user with the following command, replacing <username> with a username of your choice:
adduser <username>
You will be prompted for a password. Enter and confirm using a new password (different to your root password) and store it in a safe place. You will also see prompts for user information, but this can be left blank. Once the user has been created, we will add them to the sudo group so they can perform commands as root. Replace <username> with your chosen username.
usermod -aG sudo <username>
Now, while still as root, we will update the system from the Ubuntu package repository:
apt update
apt upgrade
Next we will check and make sure the necessary ports are opened in the firewall. If you are using a home set-up, you may need to open the same ports in your home router.
sudo ufw allow 8328:8329/tcp
sudo ufw allow 8328:8329/udp
sudo ufw allow 10000:12000/tcp
sudo ufw allow 10000:12000/udp
Let’s reboot now, to make sure all configurations are set.
reboot now
Part 3 – Dependencies and SafeCoin Validator Files
Open Putty again, and SSH into the VPS. This time log in with your username and password you created in Part 2.
Download all dependencies and programs we will need.
curl https://sh.rustup.rs/ -sSf | sh
*When prompted with “Proceed with Installation”, Type 1 then Enter.
source $HOME/.cargo/env
rustup component add rustfmt
rustup update
sudo apt-get install libssl-dev libudev-dev pkg-config zlib1g-dev llvm clang make git
*If prompted with “Do you want to continue?”, type Y and hit Enter.
We are now ready to start building the Validator Program.
First, lets download the necessary files from the SafeCoin GitHub.
git clone https://github.com/Fair-Exchange/Safecoin.git
Then use the following command to set the rust version:
rustup override set 1.65
Next, lets move into the SAFE directory.
cd Safecoin
Now in SAFE, lets compile the Validator program. This may take 5-45 mins, depending on your machine.
cargo build --release
Once finished, lets download a few more files.
./fetch-perf-libs.sh
Now let’s back out of the SAFE directory.
cd
Part 4 – Wallet Files and Seed Backup
Now we will build our ledger.
mkdir ledger
In the next few steps, we will be creating our wallet addresses. Open a text file (or somewhere to save seed words).
~/Safecoin/target/release/safecoin-keygen new --word-count 24 -o ledger/validator-identity.json
*Enter a BIP39 Passphrase if you want. If not, hit enter to bypass.
Save your PubKey and your 24 Seed Words for your validator-identity.
~/Safecoin/target/release/safecoin-keygen new --word-count 24 -o ledger/validator-vote-account.json
*Enter a BIP39 Passphrase if you want. If not, hit enter to bypass.
Save your PubKey and your 24 Seed Words for your validator-vote-account.
~/Safecoin/target/release/safecoin-keygen new --word-count 24 -o ledger/validator-stake-account.json
*Enter a BIP39 Passphrase if you want. If not, hit enter to bypass.
Save your PubKey and your 24 Seed Words for your validator-stake-account.
~/Safecoin/target/release/safecoin-keygen new --word-count 24 -o ledger/validator-withdrawer.json
*Enter a BIP39 Passphrase if you want. If not, hit enter to bypass.
Save your PubKey and your 24 Seed Words for your validator-withdrawer.
Next, we will set the configuration for the SafeCoin Validator.
~/Safecoin/target/release/safecoin config set --keypair ~/ledger/validator-identity.json

Now it is time to add SAFE to your Validator with the funding to vote. Let’s create a SafeCoin address from our already created wallets.
~/Safecoin/target/release/safecoin address
Copy the SafeCoin address, and send 10 SAFE to it. The transaction should confirm in a few seconds.
Use this command to check the SafeCoin balance on your Validator.
~/Safecoin/target/release/safecoin balance
Part 5 – Account Configuration and Validator Start–Up
Now, lets make sure your Validator is targeting the correct .json files for voting.
~/Safecoin/target/release/safecoin create-vote-account ledger/validator-vote-account.json ledger/validator-identity.json [VALIDATOR-WITHDRAWER-PUBKEY]
*If successful, you should see a Signature returned.
Now you are ready to start your Validator!
Be sure to choose the option you will be running, Full-History or Pruned.
To start a Full History Validator:
NDEBUG=1 ~/Safecoin/target/release/safecoin-validator --rpc-port 8328 --identity ledger/validator-identity.json --ledger ledger/validator-ledger --vote-account ledger/validator-vote-account.json --authorized-voter ledger/validator-identity.json --expected-genesis-hash HfHmB9nh7EjpqoCL2DDZ559SJW4xN52gxheWPER782jW --wal-recovery-mode skip_any_corrupted_record --trusted-validator 4BRXtL6nEKDVJdYPEwgGCfAAvEHT4C4Sj5peQz8kHGZu --trusted-validator 9MosAsijFb6WTnXVgz8UApZ4okei3fLVC63QQAqsXGDB --enable-rpc-transaction-history --entrypoint entrypoint.mainnet-beta.safecoin.org:10015 --no-snapshot-fetch &
If all goes well, you should see a .log file.
To start a Pruned Validator:
NDEBUG=1 ~/Safecoin/target/release/safecoin-validator --identity ~/ledger/validator-identity.json --ledger ~/ledger/validator-ledger --expected-genesis-hash HfHmB9nh7EjpqoCL2DDZ559SJW4xN52gxheWPER782jW --wal-recovery-mode skip_any_corrupted_record --known-validator Hdu5LrkxfjYG3E725pztoivTHBNYQ3RiFMUYUEEmtNsc --known-validator 4aWxVu4ZjKV9EtuCZi4b8Z1XwsvDWvyyfA7LRXjhDDsA --known-validator 4BRXtL6nEKDVJdYPEwgGCfAAvEHT4C4Sj5peQz8kHGZu --vote-account ~/ledger/validator-vote-account.json --authorized-voter ~/ledger/validator-identity.json --rpc-port 8328 --enable-rpc-transaction-history --entrypoint entrypoint.mainnet-beta.safecoin.org:10015 --entrypoint entrypoint2.mainnet-beta.safecoin.org:10015 --entrypoint entrypoint3.mainnet-beta.safecoin.org:10015 --limit-ledger-size
One last command to ensure your Validator continues to run after closing the terminal.
disown
To watch your Validator in action, use the command below. Just use <safecoin-validator-*.log> , and replace *.log with your returned .log file when you started your Validator.
tail -f <safecoin-validator-*.log>
You can also check your SafeCoin Validator Address on the Block Explorer to see it voting on blocks.
https://explorer.safecoin.org/
Your .json files are your Private Keys!!! Please take this time to back them up and store offline. If your Validator gets destroyed, deleted, corrupted in any way, these .json files will enable you to rebuild your Validator and restore your coins!!!
Part 6 – Setting up your Staking Account
Delegators should never need to send their funds or keys to the validator.
For more detailed options: https://docs.solana.com/cli/delegate-stake
There is a 1-2 Epoch Warm-Up time, as well as a 1-2 Epoch Cool-Down time for staking. Once coins are staked, it will take 2-4 days for the stake to become Active. The same goes for de-activating a stake for withdraw.
First, we need to send our Staking Balance to the SafeCoin wallet address we created in Step 4. This is the same address as your Validator Identity.
Now let’s create our Stake Authority and our Withdraw Authority .json files. Please save your Seed Phrase that follows each.
~/Safecoin/target/release/safecoin-keygen new --word-count 24 -o ledger/stake-authority.json
*Enter a BIP39 Passphrase if you want. If not, hit enter to bypass.
Save your PubKey and your 24 Seed Words for your stake-authority account.
~/Safecoin/target/release/safecoin-keygen new --word-count 24 -o ledger/withdraw-authority.json
*Enter a BIP39 Passphrase if you want. If not, hit enter to bypass.
Save your PubKey and your 24 Seed Words for your withdraw-authority account.
The next step here is for your Validator to actually register the initial stake account. Using the command below replacing [AMOUNT] with how much you would like to stake.
*10,000+ SAFE is recommended, but if this is your first time following these steps also consider starting with 1 SAFE.
~/Safecoin/target/release/safecoin create-stake-account ledger/validator-stake-account.json [AMOUNT] --from ledger/validator-identity.json --stake-authority ledger/stake-authority.json --withdraw-authority ledger/withdraw-authority.json --fee-payer ledger/validator-identity.json
You will receive a signature from the above command. Save this Signature (Transaction ID) for future reference.
Copy the Signature and Paste into https://explorer.safecoin.org/. Scroll down to “Stake Initialized”, and copy your Stake Account address. Save this address!
This address was derived from your Validator-Stake-Account.json Private Key.
*Stake-Authority.json and Withdraw-Authority.json, as their name suggests, have control over these funds. They do not need to be kept with a running validator. They can, and probably should be, Stored Offline.
~/Safecoin/target/release/safecoin delegate-stake [STAKE_ACCOUNT_ADDRESS] [VOTE_ACCOUNT_ADDRESS] --fee-payer ledger/validator-identity.json --stake-authority ledger/stake-authority.json
The above command delegates stake from your staking account to a voting address (such as your own, or can be someone else’s).
Optional: Will others be delegating to you? If so please set a commission here. If not, this can be skipped.
~/Safecoin/target/release/safecoin vote-update-commission ~/ledger/validator-vote-account.json <15> ~/ledger/validator-identity.json
You now have a working Stake Account!
Your .json files are your Private Keys!!! Please take this time to back them up and store offline. If your Validator gets destroyed, deleted, corrupted in any way, these .json files will enable you to rebuild your Validator and restore your coins!!!
***There is one Final step, getting users to delegate their funds to you. ***
We are currently working on releasing a GUI solution for this which will be released VERY shortly.